• Amazon Deals

  • Ebay Affilliate Links

Nokia Lumia Windows Device recovery tool Microsoft official download location

If your Nokia Lumia phone, including Nokia 830 and 930 have stopped working properly after a windows 10 mobile update, you will need the Windows Device recover tool from Microsoft to roll back the operating windows 10 mobile operating system back to windows 8.1.

In Australia, on the Nokia 930 the Telstra branded update can break, resulting in microsoft edge not being installed, and you being unable to sign into your microsoft account login.

The store will also be broken, because without being able to log in, you cannot install edge again, but on a cruel catch 22, you cannot log in witout installing the correct app… which require a successful Microsoft account login.

Anyhow, the official Microsoft download link to the Microsoft device recovery tool for Nokia Lumia phones can be found below:

https://support.microsoft.com/en-us/help/12379/windows-10-mobile-device-recovery-tool-faq

The link is just to a package installer, of 2.3Mb. An obnoxious and convoluted download process may begin after installation of the initial installer from Microsoft.

windows_recovery_tool_nokia_lumia_working_screen


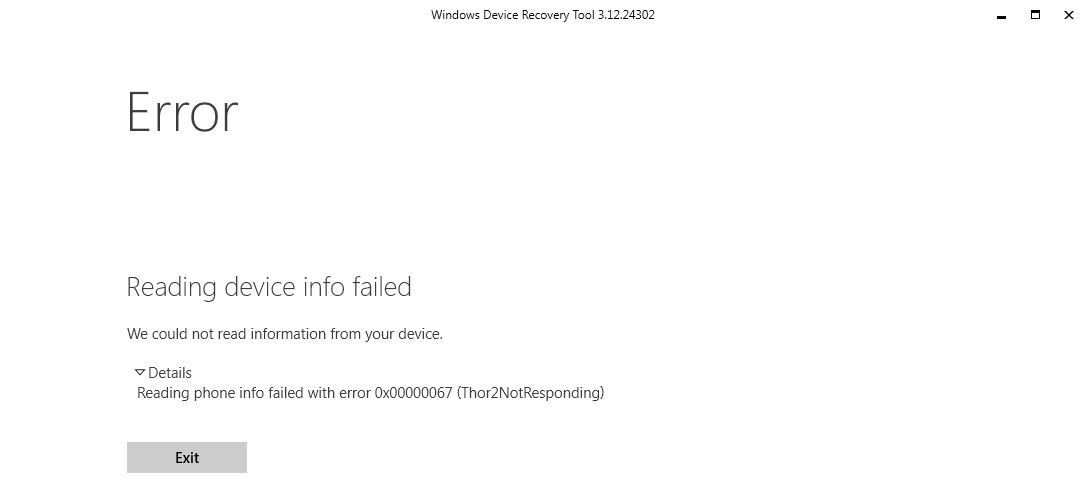
annnnnd.. an error 0x00000067 (thor2NotResponding) is thrown on my Nokia Lumia 930

windows_recovery_tool_nokia_lumia_error0x00000067(Thor2NotResponding)

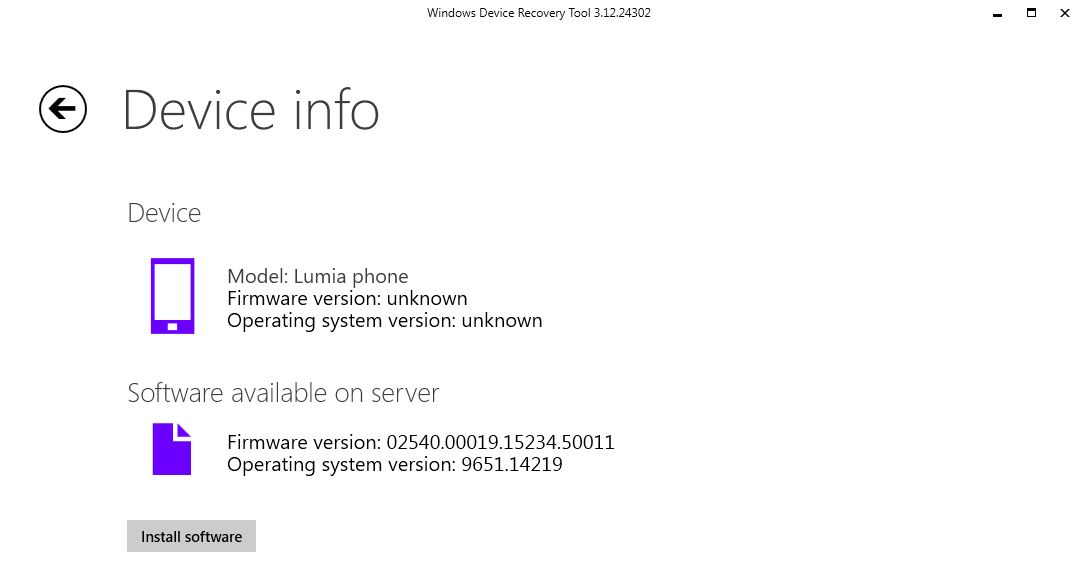
eventually, after some trial and error, and at the prompt, hitting power + volume down till the phone vibrated the following screen pops up, offering a download of a suitable windows mobile OS version from the server.

windows_recovery_tool_nokia_lumia_reinstall OS

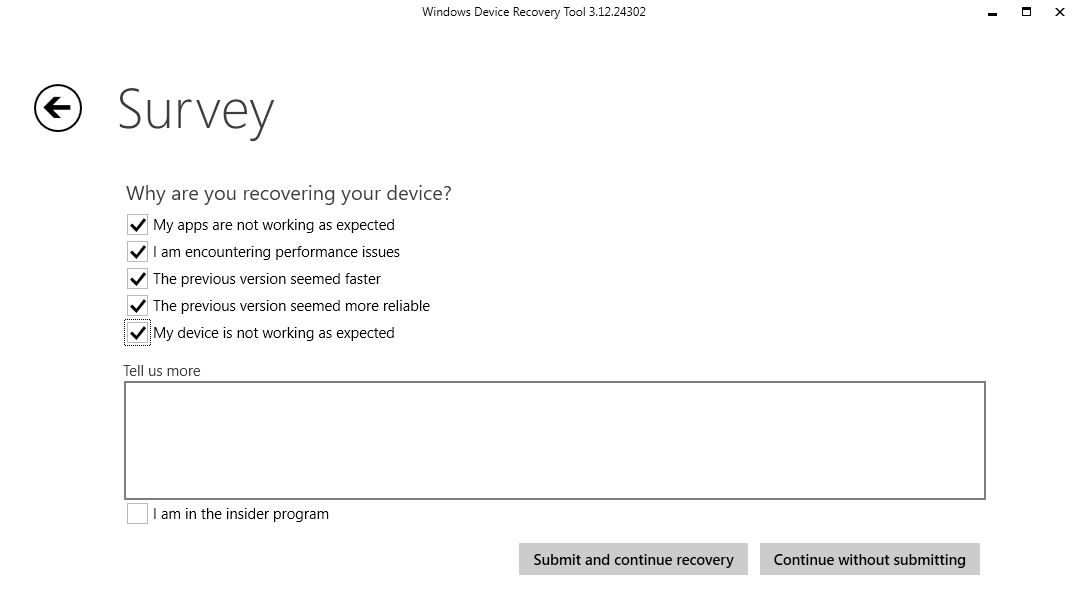
Upon clicking “install software, Microsoft asks you why you are ditching windows 10- performance issues, apps nor working as expected etc etc.. I basically clicked EVERYTHING! and moved on!

windows_recovery_tool_nokia_lumia_survey_screen


The file size for the OS flash of windows 10 / 8.1 mobile is a whopping 1.78BG in size. Quite a chew on my data allocation for the month!

windows_recovery_tool_nokia_lumia_windows_10_81_file_size_GB

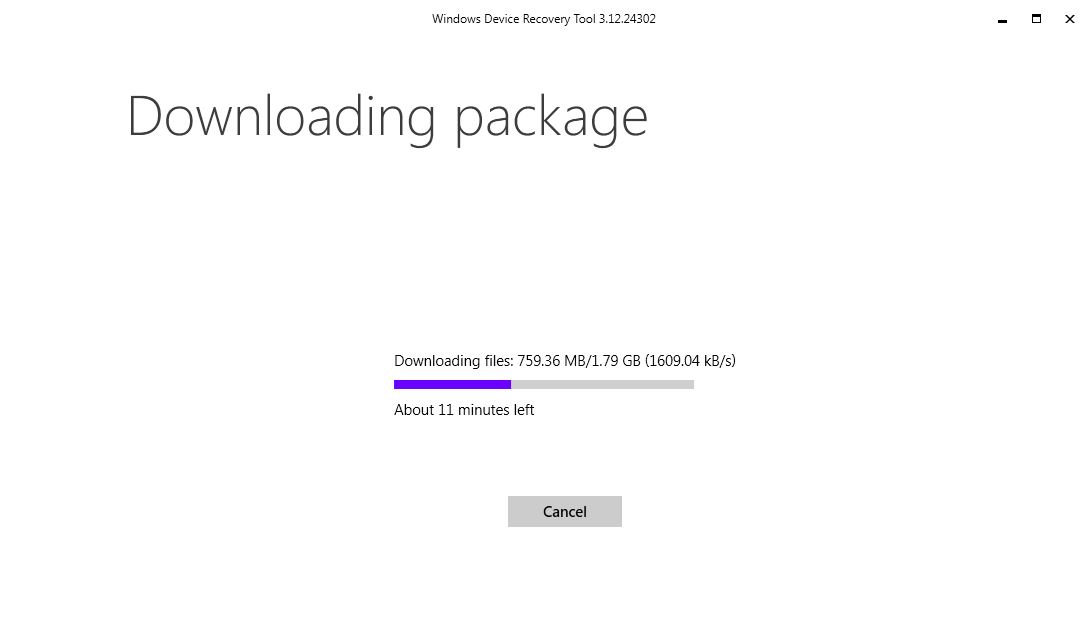
After about half an hour chewing my expensive mobile data, the download finally finished.

The only nice thing about this is that it stores away these installer files on your C: root drive for later use if you need them, or if the download fails halfway though, saving you time, instead of restarting the whole process again.

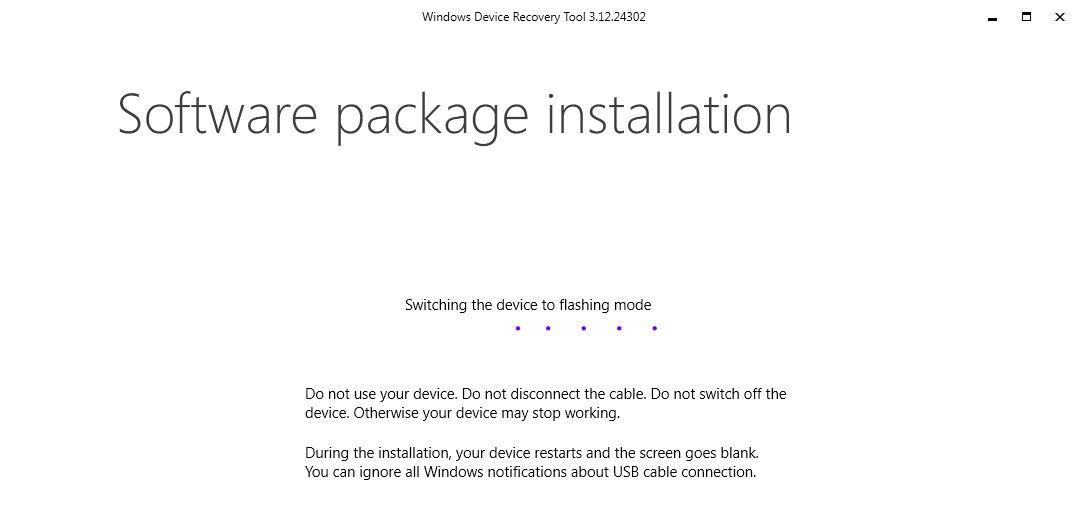
When complete,the program switches over to trying to get the windows Nokia Lumia phone to switch to flashing mode so the new OS or reinstall will be accepted.

windows_recovery_tool_nokia_lumia_switching_to_flashing_mode

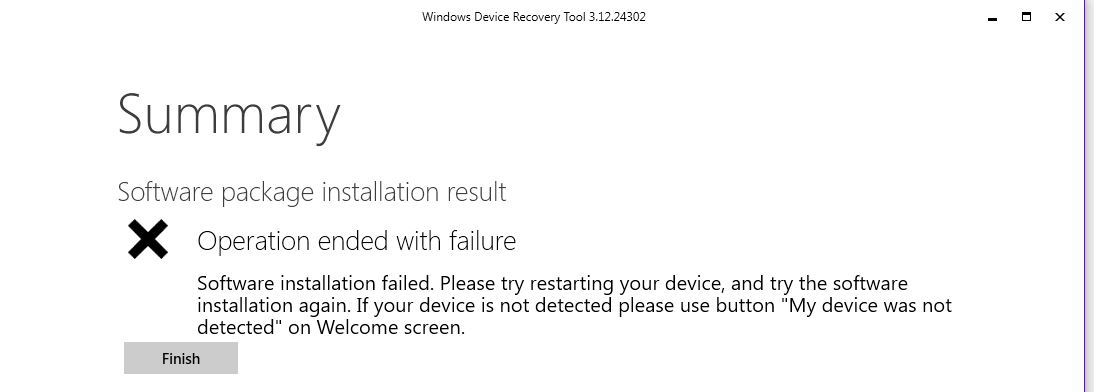
After spinning away for aeons, my first attempt to reinstall windows mobile on my nokia lumia ended in utter failure, and the program crashed badly not long afterwards, requiring the task manager to put it out of its misery.

On research on the net, a lot of people have problems with a nokia lumia phone switching into flashing mode and it just hangs. In my case, I think the problem was that the phone was running, with its OS active at the time, as indicated by its start screen covering the screen. I think it needs to be in an early boot mode to switch successfully.

windows_recovery_tool_nokia_lumia_operation_ended-with_failure

On a second attempt however, I rebooted the phone with the power+downvolume hold technique, THEN, quickly plugged in the phone immediately when when the screen showed the NOKIA logo, on a black background.

This met with significantly more success, and the windows mobile flashing operation on the Nokia Lumia phone began working.

windows_recovery_tool_nokia_lumia_software_package_installation

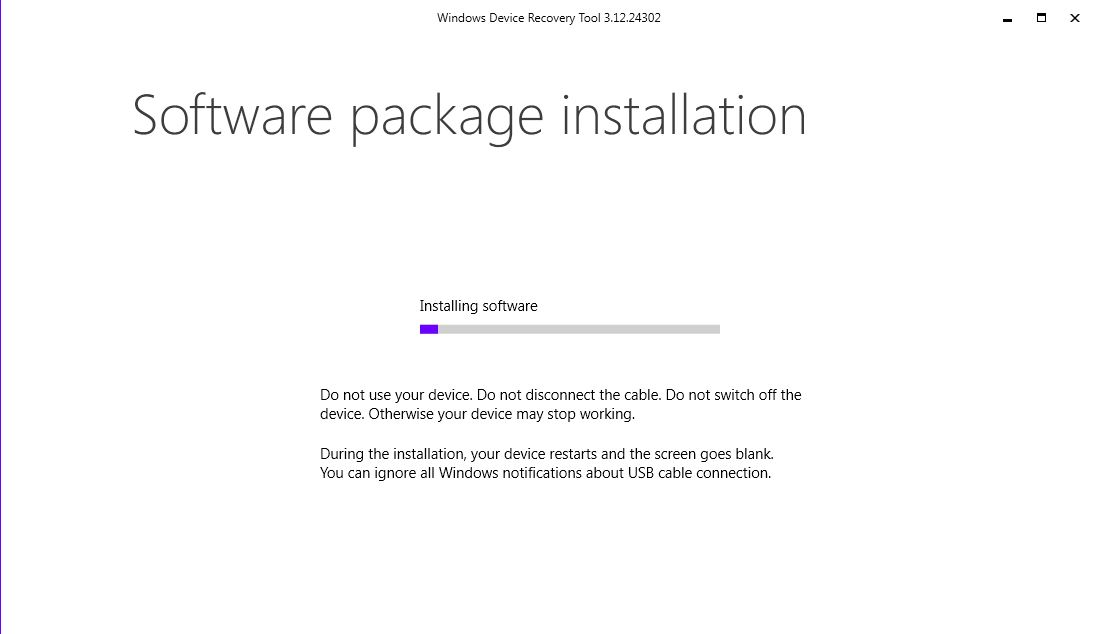
On the phone side, the Nokia lumia 930 phone screen turned a disturbing BLOOD red colour, with a progress bar that mirrored what was going on on the computer.

windows_recovery_tool_nokia_lumia_operations_successfully_completed

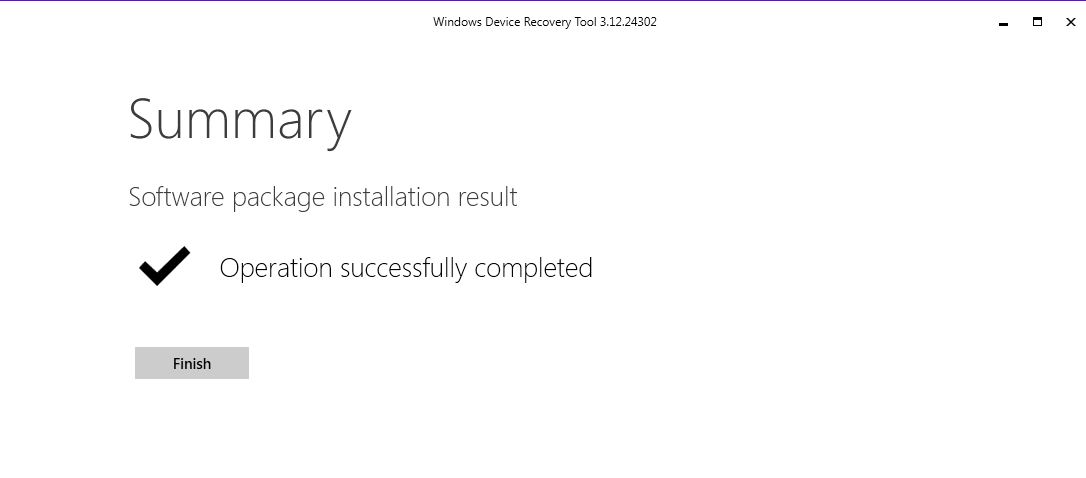
As the progress bar came to the end, the Nokia Lumia Microsoft windows device recovery tool displayed a successful flash had been executed.!

[amazon_link asins=’B00NB5XGDO,B01BCXHJMU,B00THPVPS0,B017V4OEYA,B06XDSNSQN,B01LILSI5S,B010DQZX3Y,B00N1BOJV6,B00KM10PMA,B01CG94VGQ,B016O0GB7K’ template=’ProductCarousel’ store=’Bunnyscrum-20′ marketplace=’UK’ link_id=’44b50be7-90b7-11e7-9483-cbd08bfa9f5f’]

How to create bootable Windows to go USB drive + Convert .esd to .Wim Windows 8.0 / 8.1 / 10

This post is a FULL tutorial on how to create a bootable “windows to go” USB drive without the enterprise edition of windows 8.0 or 8.1

Windows to go- A portable operating system on a memory stick!

Normally, a portable, bootable standalone operating system on a USB version of windows 8, or 8.1 is only able to be officially created by a licensed copy of the enterprise edition of windows.

However, there is a nice workaround that can be done, so you can create a “to go” version of windows on a USB with just a standard pro license of 8.0 or 8.1. Its just a bit more involved though, and requires you to use a couple clever 3rd party programs and some patience to pull it off.

Apparently this technique may work for windows 10 too! Just need to test it! Comment below if it works for you!!

I managed to do this only after searching for quite some time, and piecing a number of tutorials together as i encountered various problems along the way via trial and error.Microsoft is crafty, and reads the tutes that appear on the web… and shuts down convenient wormholes that allow you to really act as a power user of windows.. instead of a zombie.

Given the annoyance and trouble I went to last night to produce a licensed, portable version of windows that simply runs off a USB thumb drive, I thought it worthwhile to write this post to make it easier for others out there.

Ingredients for a USB install of windows:

  • A blank USB flash drive with 16GB+ of spare capacity. (MEM-1)
    • This is the USB you will be putting the live working version of portable windows 8 on!!
    • A 32GB+ USB 3.0 Drive is recommended, but a slower USB 1.0/2.0 will work just fine.
    • Larger capacity drives will give you some more space to install other programs and have user files in there as well.
    • Don’t have any other data on this stick! it’ll get deleted when you put the portable operating system on it. Back up your data somewhere else, and you can put it back on this stick once the installation process is finished and you have your USB version of windows up and running!
  • ANOTHER Blank USB flash drive with 8GB+ capacity (MEM-2)
    • You may need this one if you don’t have a CD of windows OS install- read on!
  • Your Windows 8.0 or 8.1 CD key / Serial number.
    • Look on the bottom of your laptop, or in the box your windows tablet came with for the registration keys related to your windows license.
  • A copy of Windows 8.0 or 8.1 Install media (ISO FILE or installation CD)
    • This is usually the recovery and windows reinstalling CD that often comes with your laptop or tablet (often filled to the brim with bloatware)
    • If you don’t have the CD, or don’t like the bloatware your hardware manufacturer puts in the box with your device/computer, you can download the windows 8.0 or 8.1 installation files off the microsoft website for free.
    • BEWARE! DONT get it off another internet bit torrent or sketchy russian website source- it will probably contain some kind of nasty computer virus, botnet slaver or creepy spyware esigned to steal your credit card numbers!
    • Windows 8.0 / 8.1 : Microsoft site- Free and legal windows 8 installation files
      • Download and use the media creation program to obtain the windows ISO file you need.
    • Windows 10 : Microsoft windows 10 free download of installation files
  • A working installation of the “Rufus” utility by AKEO consulting – FREELY downloadable!
    • Click on this link to get a Free Download of RUFUS from its creator
    • Rufus is a very useful little program that allows you to create bootable USB flash drives, and load ISO images on them, as well as MS-DOS (Freedos) bootable drives, and format them correctly in FAT32, NTFS and more. (Why formtting is important we will get to later in the tute)
  • A working installation The GImageX program – FREELY Downloadable!
    • Click on this link to Download free GImageX from AUTOIT
    • This program hooks into a command line microsoft utility that is used by network admins to do custom installs of windows. For us, the average Joe, RUFUS overlays a pretty graphical user interface (GUI) to make it easier to use.

Backdoor Method for creating a windows to to USB drive with no Enterprise edition.

Step 1: Format Memory sticks using RUFUS utility.

  • Run RUFUSRUFUS_format_no_image_mount
  • Error check your Memory sticks (both MEM-1 & MEM-2 using RUFUS
  • REFORMAT your memory sticks to NTFS format, NOT anything else.
    • FORMAT is VERY IMPORTANT! If you use FAT32, the following process will throw a “cannot create file or folder” error when your write your windows setup files to the USB later on.
    • Why the error? Apparently it has something to do with the limitations of how many files can be put onto the root directory of a FAT32 volume.


STEP 2: Find install.wim file, or install.esd file.

  • Grab your secondary memory stickrufus_Win2go_mount_ISO
  • Take the ISO file of WIN 8 you got from the CD, or downloaded from Microsoft directly, and use RUFUS to mount the image on the stick.
  • Search the directory “sources” for a file called “install.wim”
  • If you can find it, happy days! note down the exact file path- you can then skip step 3!
  • BUT, Chances are, if you downloaded your ISO install media image from Microsoft recently, there WILL BE NO WIM FILE, which will cause you a hassle!. Microsoft has upgraded their media to an encrypted format called .esd to make it harder for people to make custom installs without more advanced knowledge.
  • IF there is NO “install.wim” file, look for a file called “install.esd” and you will have to undertake step 3.
  • Note down the file path of “install.esd”
  • What we need is a .wim file, so we will need to convert .esd to .wim somehow.

STEP 3 – Convert esd file to wim

  • Bring up a command prompt as “administrator” – i.e. an elevated command prompt.
  • Log the memory stick drive that you mounted the ISO image of the WIN-8 setup to earlier using RUFUS.
  • navigate to the sources directory
  • type the following to interrogate the index.esd file in there:
  • >> dism /Get-WimInfo /WimFile:install.esd
  • interrogate_ESD_file_CMD_PROMPT
  • Then enter the following command string to easily convert the ESD file into a WIM file.
    • >> dism /export-image /SourceImageFile:install.esd /SourceIndex:1 /DestinationImageFile:install.wim /Compress:max /CheckIntegrity
  • convert_ESD_to_WIM_command_prompt_win2go
  • Note, this command will dump the file into the same directory- “sources”
  • Note the path of the new install.wim file you have created.

STEP 4: Image the Install.wim file onto A USB drive using GImageX software.

  • Run GImageX software
  • Click on the “apply” tab
  • Set the following:
  • Source: The path of the install.wim file you found or created earlier from an .esd file.
  • Destination: The USB drive you wish to install windows to go on.
  • load_wim_with_GImagex_step1
  • Click the Apply button, and the program will install a portable version of Windows 8 on the targeted USB drive.
  • This could take quite a while. Because, in my case, was installing from USB stick to USB stick, it took over SEVEN HOURS to complete!
  • Probably not a good idea in hindsight- but I’m not sure if the process woudl work if i moved the WIM file to the C: drive instead. Try that, and let me know how it goes, comment!
  • When complete, the USB drive will now have a working copy of Windows 8 to go on it.
  • The first time you run it, it may go through the registration process, after then, it should just work.

STEP 5 – Mark the USB partition “active” using Windows Disk management tool

Bring up the windows utility “Disk Management Tool”

Select the External USB drive you have your windows 2 go install on

Right click, and on the menu that comes up, click on “mark partition Active”

However, if the “mark partition active” option is greyed out, you will have to use the elevated command prompt program “Diskpart” to get this to work.

In this case, at the command prompt to start the program; type

>> diskpart

Then , to bring up the official names of all the disks on the computer, type:

> list

  • Then,

>> list partition

  • and finally, type

>> Select partition 1

  • then, to mark the selected partition as the active; type

>> ACTIVE

win2go_mark_primary_partition_as_active

DONE!

STEP 6: Load USB drive with “Boot Entries”

  • Open Command prompt as Administrator
  • Log your WInd2go drive as the active drive in the command prompt.
  • i.e. if your drive is E:
  • then simply type in: “E:”
  • Change directory to the system32 directory of your win2go drive
  • i.e. cd windows\System32 (for 32 bit installs)
  • type in;

>> bcdboot.exe E:/Windows /s /f ALL

  • This command string will install boot entries on the USB drive you are tying to get to run WIN2GO.

STEP-7 – BOOT Win2go

  • Switch on computer
  • configure you computer’s boot order in the bios menu.
  • On this computer, the boot order can be modified by hitting F10, its the same for many modern computers!

Thanks and credit has to be given to the other authors on the web who provided  guidance and inspiration for the tips you see in this post:


http://www.admin-magazine.com/Articles/Putting-Windows-8-on-a-USB-Drive

http://thehastingsfiles.blogspot.com.au/2015/06/converting-installesdto-installwim.html

http://www.instructables.com/id/How-to-Create-a-Bootable-USB-Drive-Without-Using-A/

http://www.howtogeek.com/196817/how-to-create-a-windows-to-go-usb-drive-without-the-enterprise-edition/


  • Amazon Deals